Quick Quote

Quick Quote & Free Sample Requests

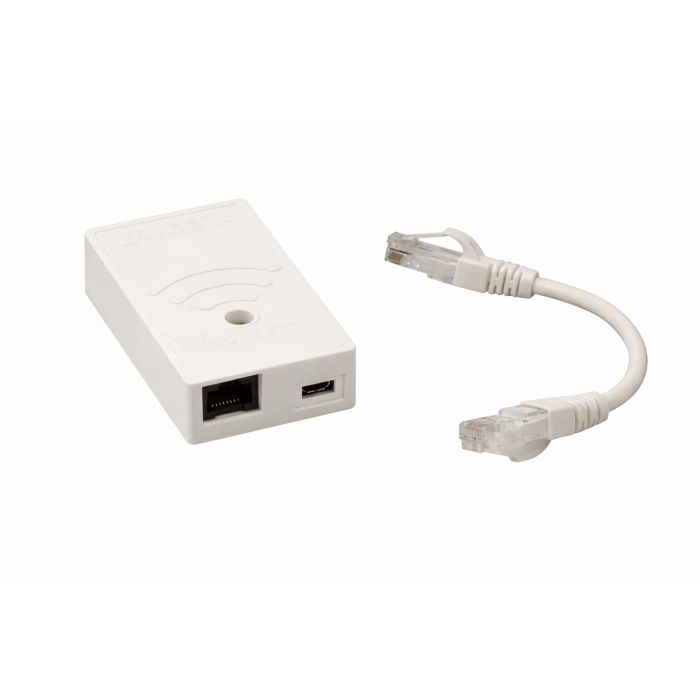
Electric Curtain Track Shuttle Wifi Dongle - Alexa Compatible

Total Cost:
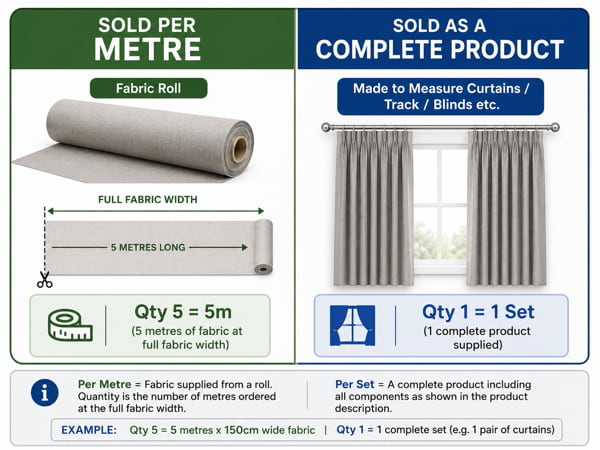
: Set ?
Total Cost:
  • visa
  • mastercard
  • maestro
  • paypal
  • bacs
  • ssl
  • secure payments
Estimated Delivery

Next Day Expected But Not Guaranteed. (Ex NI, SH, I)

UK Mainland £5.99

UK Mainland Over £250

FREE

Forest Smart Wi-Fi Dongle for Electric Curtain Tracks

Upgrade your Direct Fabrics electric curtain track to app control with the Forest Smart Wi-Fi Dongle. This compact plug-in module connects to the Forest Shuttle motor in the track system, letting you open, close, and stop your curtains from your phone using the Forest Connect app. Once paired, you can also run schedules and automations, including timed opening and closing for day-to-day convenience and added security.

The dongle connects to your 2.4GHz Wi-Fi network and keeps your curtain track accessible when you are at home or away. It is a straightforward way to add smart control to a quiet, made-to-measure electric curtain rail, with voice assistant support via Google Home and Amazon Alexa.

Key benefits

  • App control via Forest Connect (iOS and Android)
  • Remote control over the internet, not limited to your home Wi-Fi
  • Voice control support through Google Home and Amazon Alexa
  • Timers, routines, and automation options in the app
  • Stable 2.4GHz Wi-Fi connectivity (one dongle per motor)
  • Ideal add-on for the Direct Fabrics home automated electric curtain track system

Forest Wi-Fi Dongle FAQs

Answers to the most common setup, connectivity, and compatibility questions for the Forest Wi-Fi Dongle used with Forest Shuttle motors.

General

Where do I get the Forest Connect app?
Download “Forest Connect” from the Apple App Store or Google Play Store.
Which phones and tablets are supported?
iOS 9.0+ and Android 4.4+ are supported.

Connecting

No LEDs light up on the dongle when connected to the Shuttle. What do I do?
  1. Confirm the Shuttle motor has power.
  2. Confirm the dongle is connected to Port 1 on the Shuttle.
  3. Hold the connect button for 10 seconds until the dongle shows orange.

If it still does not light, power the dongle via its Micro-USB port using a 5V USB adapter and Micro-USB cable, then retry.

The dongle will not connect to my Wi-Fi.
  • Repeat setup in the app and confirm the correct network and password.
  • Check the dongle is within range of your router.
  • Use a 2.4GHz network. 5GHz is not supported.
  • If SmartConfig fails, try Access Point mode.
SmartConfig setup fails (blue flashing).
Configure using Access Point mode in the Forest Connect app.
I changed router/modem. Do I need to reconnect?
Yes. Reset the dongle (hold connect for 10 seconds), then add it again in Forest Connect and connect it to your Wi-Fi.
Will it reconnect after a power cut?
If your Wi-Fi details are unchanged, it should reconnect automatically. If your network changed, reset and add it again as a new device.
My Wi-Fi password or SSID changed. Do I need to reconnect?
Yes. Reset (hold connect for 10 seconds) and reconnect using the Forest Connect app.
Can I use the dongle data port for Ethernet networking?
No. The data port is intended for the Forest Shuttle motor connection, not for a network cable.
Can I use the dongle without Wi-Fi?
No. The dongle must be connected to a Wi-Fi network.
Google Home or Alexa cannot find the dongle.
Confirm it is configured and controllable in the Forest Connect app first, then retry linking it to your smart assistant.
I have a Shuttle with Z-Wave. Can I add Wi-Fi using this dongle?
Yes, the Wi-Fi dongle can be used with a Forest Shuttle that has Z-Wave.

Configuration

The dongle flashes yellow instead of blue (or blue instead of yellow).
Hold the connect button for about 6 seconds until the light turns purple, then release to switch modes.
What does flashing blue mean?
Blue flashing means SmartConfig mode, ready to pair using the Forest Connect app.
What does flashing yellow mean?
Yellow flashing means Access Point mode, ready to pair using the Forest Connect app.
What does flashing red mean?
The dongle has lost Wi-Fi connection and needs to be reconnected in the Forest Connect app.
What does solid red mean?
The dongle has lost communication with the Shuttle. Check: Shuttle has power, dongle is in Port 1, cable works (swap to test), and cable length is within 1.5m (5ft).
How do I reset the dongle?
Hold the connect button for 10 seconds until the LED turns orange, release, wait a moment, then it should start flashing blue.
SmartConfig vs Access Point mode, what is the difference?
SmartConfig (blue) is the default, simpler setup method. Access Point (yellow) is the fallback method when SmartConfig does not work and requires extra steps.
Configured, but the master carrier does not move.
Ensure the track is commissioned and limits are set. If limits are set, confirm the dongle is in Port 1, the cable is functional, and the cable length is within 1.5m (5ft).
Can I configure the dongle without Wi-Fi, or from another location?
No. Initial setup requires your phone/tablet and the dongle to be connected to the same Wi-Fi network.
Can I configure using Google Home or Alexa?
No. Configure in the Forest Connect app first, then add it to Google Home or Amazon Alexa.

Technical

What is the connector cable type?
A standard UTP cable with RJ45 connectors.
Can I control it remotely?
Yes, as long as your phone has an active internet connection via Wi-Fi or mobile data.
What is the USB cable type?
A standard Micro-USB cable.
Operating temperature range?
0°C to 40°C (32°F to 104°F).
Power requirements for the Micro-USB input?
5V. Use an adapter rated at least 600mA, and do not exceed 1000mA. Fast chargers are not recommended.
What Wi-Fi specification is supported?
2.4GHz only, IEEE 802.11 b/g/n, channels 1 to 14 (2400 to 2483 MHz).
Maximum connector cable length?
1.5m (5ft).

Controlling

Can I use voice control?
Yes, via Google Home or Amazon Alexa.
Which devices can I control?
Forest Shuttle S, M, and L motors.
Can I use it when my phone is not on Wi-Fi?
Yes, as long as your phone has internet access via mobile data or another network.
Do I need to be near the dongle to control it?
No, remote control works after configuration.
Does it need cloud connectivity?
Yes, it needs to be connected to the cloud to function.
Can I create timers, sunrise/sunset actions, and flows?
Yes, these can be set up in the Forest Connect app.
Can I keep using Forest RF remotes and switches?
Yes, the dongle can operate alongside Forest RF remotes and switches.
Can one dongle control multiple Shuttles?
No. Each Shuttle requires its own dongle.
The app shows movement, but the curtains do not move.
Check limits are set on the track, confirm the cable is in Port 1 (not Port 2), keep cable length within 1.5m, test a replacement cable, and consider that the Shuttle could be outdated.

Compatibility

Is it compatible with Google Home?
Yes.
Is it compatible with Amazon Alexa?
Yes.
Does it support Z-Wave?
No. For Z-Wave control, you need a Shuttle Z-Wave product.
Is it compatible with Apple HomeKit?
No. If you need HomeKit style control, use a Wireless Connector with a HomeKit compatible smart plug instead of the Wi-Fi dongle.
Delivery Next Day Expected But Not Guaranteed. (Ex NI, SH, I)
5.0 (1)

Customer Product Reviews

5.0

1 reviews

100% of customers recommend this product

Write a review

Share your thoughts with other customers

Top customer reviews

  1. Fast Service

    Review

    Fast Service, and "Live Chat" worked fine. No issues at all placing and receiving my order
    Was this review helpful?
    0 people found this helpful
Write Your Own Review
Only registered users can write reviews. Please Sign in or create an account

How to Measure For Curtains, Blinds and Tracks.


Pen and Paper

For recording your
measurements.

Helper

Someone to assist if your
windows are large .

Metal Tape Measure

As this will allow you to get a
rigid full length measurement.


Make sure your curtain tracks and poles are fitted in the position you want.


Choose the type of curtains that you would like and how you want to hang your curtains. See our heading styles guide


We recommend fitting your hardware first before measuring, this avoids any issues with not getting the perfect fit.


Measure your window using our main guide. Quick summary below. Remember wave, pinch, and designer headings require slightly different measurement

Measure in 3 places and take the shortest drop – Floors and ceilings can run out.

Double / Triple check your measurements

how to measure for curtains


Choosing your Curtain Track Width

The width of the curtain track should extend past your window this allows for the curtains to stack back away from your window and allow light in.

Measure your recess and then add on 15cm on either side. For acoustics , we recommend further to fully cover the window and the surrounding area. In our test we added an additional 30cm to the width and also made the curtain floor length.

Wave curtains, for every 100cm of track the curtains will stack circa *18cm

Eyelet curtains, they will stack back circa 10cm per *70cm of track width

Pencil Pleat will stack approx 25% of the track width. eg. 210cm track will stack 52.5%

* all dependent on thickness of fabric


Selecting your Curtain Drop

Where to Measure From for Different Type of Curtains

Type of Curtains

Fitted On

Where to Measure from - to desired length

Pencil Pleat Curtains

Curtain Track

Top of the Track - If using a extra wide track or designer track like silent gliss metropole, then measure from the underside of the track.

Pencil Pleat Curtains

Curtain Pole

Measure from small ring at the bottom of eye under the ring, this is where your curtain clips into.

Eyelet Curtains

Curtain Pole – Only

Top of the pole *we add on the upstand to our curtains,

Pinch Pleat Curtains

Curtain Track

The underside of the track

Wave Curtains

Curtain Track Designer Pole

The glider underneath the track. The curtain will sit under the track.

Acoustic Curtains

See Heading Style of Choice above

Same but make sure wider than normal ideally 30cm past either side and 30 above. Also to the floor.


How to Measure for Blinds going Inside the Recess

How to measure for blinds inside thet recess

  • Measure the exact width of the recess in three places; at the top of the recess, in the centre of the recess and near the bottom - then take the  smallest size.
  • Measure the exact drop of the recess in three places on the left hand side of the recess, in the centre of the recess and on the right hand side of the recess - then take the smallest size.
  • We will take one cm off the finished width size you have given us, to allow for the blind to pull up and down easily.
  • Double check your measurements
  • Cord Safety - Mounting Height - We ask for the mounting height of your blinds to allow for the cord to be 150cm off the ground. If mounting at 210cm This is what you enter in the Fitting height box. We make a deduction to ensure the cord is 150cm from the floor. Thus the cord loop will be 60cm

How to Measure Outside of the Recess


  • Measure the recess in 3 places on the width and also 3 places on the drop. Take the widest measurement.
  • Measure the width of the actual recess plus an additional amount – Usually from 7cm-15cm whatever you think looks appropriate. This is for overlap.
  • Measure the exact drop of the recess. The blind would be fitted above the recess, so check the space above and add an amount on to the drop – usually from 7-15cm
  • These sizes you have taken will be the size of the finished blind.

  • Double check your measurements
  • Cord Safety - Mounting Height - We ask for the mounting height of your blinds to allow for the cord to be 150cm off the ground. If mounting at 210cm This is what you enter in the fitting height box. We make a deduction to ensure the cord is 150cm from the floor. Thus the cord loop will be 60cm


Cubicle Tracks you have to measure with right angles from wall to wall where you want the track to go

Draw your room on a piece of paper with a sky view

Now measure from the wall to wall for straight tracks,

L Shape Tracks Measure to a point on the floor and mark with a piece of tape. Then for the other sides measure from the other wall to that point.

Always check for obstructions and fitting issues you may need to work around


Quick Quote & Free Sample Requests
Excellent
Quick Quote & Free Sample Requests

SAVE TIME - Send your project requirements, large or small. Sample Lists etc

100% privacy guaranteed
loader
Loading...